
Desserts
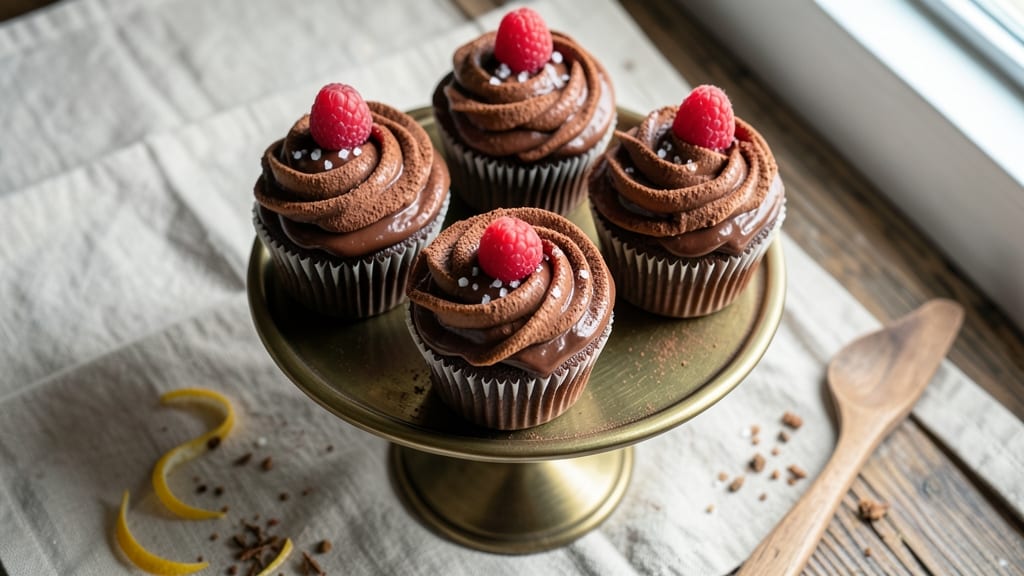
This chiffon chocolate cupcake recipe delivers the perfect balance of light-as-air height and rich, fudgy chocolate flavor—something store-bought versions can’t match. The secret lies in the chiffon technique, where whipped egg whites create air pockets that give these cupcakes their signature tender crumb and towering domes.
I’ve perfected this recipe over years of testing, ensuring every batch rises flawlessly while maintaining that deep chocolate satisfaction.
The process might sound intimidating at first, but it’s actually simpler than you think. You’ll start with a basic chocolate cake batter, then fold in stiffly whipped egg whites in a way that preserves all that air—no deflating the volume.
Baking at the right temperature is key to achieving that signature crackly top without drying out the interior. The result? Cupcakes with a moist, velvety texture that’s both rich and airy, not dense or cakey.
What makes these cupcakes truly special is how they satisfy two cravings at once: the lightness of a chiffon and the indulgence of fudgy chocolate. They’re perfect for birthdays, dessert parties, or even a special treat for yourself.
The recipe includes optional garnishes like chocolate ganache or dusting powder, but the cupcakes themselves are already irresistible. Let’s get started on creating these showstopping desserts.
One of the biggest challenges with chiffon cupcakes is avoiding dense results, which is why I’ve included troubleshooting tips in the instructions. From properly measuring ingredients to folding the egg whites just right, every step is designed to ensure success.
These cupcakes are worth the effort—each bite is a perfect harmony of texture and flavor that will impress even the most discerning dessert lovers.
Ingredients for chiffon chocolate cupcake
Twelve ingredients create the perfect harmony of lightness and rich chocolate flavor in these showstopping cupcakes.
| Ingredient | Amount | Notes |
|---|---|---|
| Large Egg Whites 🥚 | 8 whole | Room temperature, no yolks |
| Granulated Sugar 🍚 | 1 ½ cups | Divided for batter and meringue |
| Unsalted Butter 🧈 | ¾ cup | Melted, cooled slightly |
| All-Purpose Flour 🌾 | 1 ½ cups | Sifted, spooned lightly |
| Unsweetened Cocoa Powder 🍫 | ½ cup | Natural or Dutch-processed |
| Large Egg Yolks 🥚 | 4 whole | Room temperature |
| Milk 🥛 | ½ cup | Whole milk preferred |
| Vanilla Extract 🌿 | 1 tbsp | Pure vanilla preferred |
| Baking Powder 🧂 | 1 ½ tsp | Aluminum-free preferred |
| Salt 🧂 | ½ tsp | Fine sea salt |
| Dark Chocolate Chips 🍫 | 1 cup | 60% cocoa or higher |
| Mini Chocolate Chunks 🍫 | ½ cup | Optional for extra richness |
| Cream Cheese Frosting 🧀 | 2 cups | Optional garnish |
The egg whites are the star here—room temperature makes all the difference. Grab a clean, grease-free bowl for whipping, and use a stand mixer or hand mixer for stiff peaks. I always buy large eggs at Whole Foods or Trader Joe's—they whip up fluffier than smaller eggs. For the cocoa powder, Hershey's Special Dark or Valrhona gives that deep, velvety flavor, but Dutch-processed keeps the batter from getting too acidic. The butter? Plugrá or Land O'Lakes—never salted, and always melted just until it's fluid but not greasy.
No vanilla extract? A splash of vanilla bean paste or even vanilla sugar works in a pinch (use half the amount). Running short on egg whites? Pasteurized liquid egg whites from the dairy section are a lifesaver—they whip just like fresh. The chocolate chips can be swapped for chopped bittersweet chocolate if you want a more intense flavor. For the cream cheese frosting, Philadelphia brand is foolproof—just mix it with powdered sugar and butter until smooth. Pro tip: microwave the butter 40 seconds to just melt it before mixing, no greasy mess.
Store batter in the fridge for up to 24 hours if prepping ahead—just let it sit at room temp before baking. The cupcakes keep well for 3 days at room temperature, wrapped tightly in plastic, or 1 week in the fridge. Freeze unbaked cupcakes for up to 3 months—bake straight from frozen, adding 2-3 extra minutes. The frosting? Make it a day ahead—it tastes even better after the flavors meld. Garnish with extra chocolate curls or a dusting of powdered sugar for that bakery-fresh look.
Why You'll Love This Recipe
- Light as Air Magic: I swear, the moment you bite into one of these, you’ll forget they’re even cake—just pure, airy bliss. Whipped egg whites and sugar create that signature cloud-like texture, and the cocoa powder gives it a deep, rich base without tasting bitter.
- No-Fuss Baking: Honestly, this recipe is my go-to when I’m too tired for fuss. Just fold the dry ingredients into the meringue—no mixing until last, no overmixing, no stress. The buttercream (if you add it) is just powdered sugar, butter, and milk, so even that’s simple.
- Party-Ready Any Day: Between us, these cupcakes look fancy enough for a birthday but take less effort than grocery store muffins. The rich chocolate flavor means they’re a hit at book clubs, potlucks, or even as a quick dessert when your partner’s friends drop by.
- Budget-Friendly Luxury: Here’s what sold me—this recipe uses pantry staples and stretches further than most. The cocoa powder and butter make it feel indulgent, but you’re not breaking the bank. Leftovers? They last days in the fridge, and I’ve even frozen them for last-minute cravings.
Step-by-step instructions for chiffon chocolate cupcakes
Here's how to achieve that signature light-as-air texture with a rich, fudgy chocolate center—every time.
Whip Egg Whites to Stiff Peaks
In a spotlessly clean, grease-free mixing bowl, beat the 8 whole large egg whites with an electric mixer on medium speed until soft peaks form. This is crucial—any grease will prevent proper whipping. Gradually add ½ cup of the 1.5 cups granulated sugar while mixing on high speed until the meringue is glossy and holds stiff peaks that stand straight up when the beaters are lifted.
I like to tilt the bowl slightly as I add the sugar to help it dissolve evenly. The meringue should be thick enough to hold its shape when you lift the bowl, but still smooth and shiny. If it's too soft, whip for another 1-2 minutes—this step makes all the difference for that signature chiffon height.
Mix Yolk Batter Separately
In a separate bowl, whisk together the 4 whole large egg yolks, remaining 1 cup granulated sugar, 0.5 cup milk, 1 tablespoon vanilla extract, 0.5 cup unsweetened cocoa powder, 1.5 teaspoons baking powder, and 0.5 teaspoon salt until completely smooth. The batter should be thick but pourable—like heavy pudding. Sift in the 1.5 cups all-purpose flour and gently fold it in with a spatula until just combined. Be careful not to overmix here; you want to maintain as much air as possible.
This yolk mixture is the foundation of your cupcakes' rich chocolate flavor and moist texture. I always use a whisk for this step to avoid developing gluten in the flour. Fold in the 1 cup dark chocolate chips and 0.5 cup mini chocolate chunks now—they'll melt slightly as the cupcakes bake, creating pockets of gooey chocolate.
Fold Meringue into Batter Gently
Using a large spatula, carefully fold about ⅓ of the meringue into the yolk batter to lighten it. Then gently fold in the remaining meringue in two additions, being very careful not to deflate the air bubbles. The batter should be thick but still pourable—it should leave a trail that slowly disappears when you lift the spatula. If it's too thin, you've overmixed; if it's too thick, your cupcakes won't rise properly.
This folding technique is what creates those signature chiffon tunnels inside. Don't worry if the batter looks like it has too much meringue—it's supposed to be thick! Transfer the batter to a piping bag fitted with a large star tip for even distribution in the cupcake liners.
Bake for Perfect Height and Texture
Preheat your oven to 350°F and line a muffin tin with 12 cupcake liners. Fill each liner ⅔ full with batter—don't overfill or your cupcakes will spill over. Bake for 20-25 minutes until the tops spring back when gently touched and a toothpick inserted comes out clean. The edges should be set but the centers should still look slightly underdone.
Here's the thing about chiffon cupcakes—they continue to rise slightly as they cool. Don't overbake! The moment they're done, transfer them to a wire rack to cool completely. The contrast between the light, airy exterior and the dense, fudgy chocolate center is what makes these cupcakes so special.
Frost and Serve
Once completely cooled, pipe or spread the 2 cups cream cheese frosting onto each cupcake. The contrast between the cool, tangy frosting and the rich chocolate is pure magic. For extra decadence, add a few extra chocolate chips or mini chunks on top before serving. These cupcakes taste best at room temperature, so let them sit for about 30 minutes before serving to let all the flavors meld together.
Each bite should deliver that light, airy texture you associate with chiffon cakes, followed by a rich chocolate flavor from both the batter and the frosting. The secret to success is patience—especially with the meringue and folding steps. But trust me, it's worth every minute for cupcakes this incredible!
Pro Tips For Making Chiffon Chocolate Cupcake
- Whip Whites to Stiff Peaks: Use a stand mixer with the whisk attachment—beat those egg whites on medium-high until they hold their shape when you lift the bowl. I learned this the hard way: soft peaks collapse into sad, flat cupcakes. If your mixer struggles, switch to a hand mixer and give it 30 extra seconds.
- Sift the Cocoa: Measure cocoa powder into a fine-mesh sieve and shake it over the flour mix—don’t just scoop. Lumps sink like rocks in batter, leaving dry pockets. I used to skip this and wondered why some cupcakes tasted underdeveloped.
- Room-Temp Egg Whites: Take egg whites out of the fridge 30 minutes before whipping—cold whites fold in poorly and won’t hold volume. I was skeptical until I tried it: the cupcakes rose higher and stayed light. No excuses—just let them sit.
- Butter the Cups Well: Use a pastry brush to coat cupcake liners with melted butter, then dust with cocoa powder—this prevents sticking and adds a subtle chocolate edge. I skip this sometimes, and the first cupcake always gets stuck. Not worth the hassle.
Essential equipment for perfect results
Stand Mixer Essentials
Your KitchenAid stand mixer with the whisk attachment is non-negotiable for chiffon cupcakes. The whisk creates stiff peaks in egg whites that no hand mixer can match—I use my KitchenAid Artisan Series with the flat beater for the yolk batter.
For a budget option, the Cuisinart SM-50 handles the job just as well. Always use a spotlessly clean bowl—even a trace of grease will prevent proper whipping. 💛
Baking Tools Must-Haves
Start with a 12-cup muffin tin (I prefer Wilton Non-Stick for easy release) and high-quality cupcake liners—the Wilton Classic or Baker's Joy brands prevent sticking. A piping bag with a large star tip (like Wilton 1M) helps distribute batter evenly.
For testing doneness, keep a long toothpick handy—it should come out clean but slightly moist.
Measuring Precision
Chiffon baking demands exact measurements. Invest in a digital kitchen scale (like OXO Good Grips) for flour and sugar—1.5 cups flour by volume can vary by 10-15 grams between brands.
For egg whites, use a liquid measuring cup to ensure you're getting 8 large whites (not 8 eggs). A fine-mesh sieve helps sift dry ingredients perfectly.
Temperature Control
An instant-read thermometer (like Thermoworks Thermapen) ensures your oven is truly at 350°F—many home ovens run 10-20°F hotter than set. For the egg whites, they should reach 80°F before whipping for optimal volume. If your kitchen is cold, let them sit at room temp for 30 minutes beforehand.
Optional Extras
For garnishing, a microplane creates perfect chocolate curls from a Ghirardelli baking bar. A pastry brush helps dust powdered sugar evenly. If making ganache, a double boiler (or heatproof bowl over simmering water) prevents scorching.
Store extra frosting in an airtight container in the fridge for up to 5 days.
Nutrition facts
Frequently asked questions
Why do chiffon cupcakes have tunnels inside?
The signature tunnels form when you fold stiffly whipped egg whites into the batter. The air pockets created by the meringue expand during baking, forming those beautiful tunnels that make chiffon desserts so special. The key is folding gently to preserve the air while still combining everything evenly.
Can I make these cupcakes without a stand mixer?
Yes! Use a hand mixer or even a whisk for the egg whites, but you'll need to whip them for 5-7 minutes longer to achieve stiff peaks. Work in short bursts to avoid overheating the egg whites, which can prevent proper volume. A clean, grease-free bowl is absolutely essential for best results.
What's the secret to getting them tall and fluffy?
Three things: room temperature egg whites, properly whipped meringue (stiff peaks), and gentle folding of the batter. Also, don't overfill the liners—fill them ⅔ full and bake at 350°F for 20-25 minutes. The cupcakes will continue rising slightly as they cool.
Why did my cupcakes turn out dense instead of light?
Dense cupcakes usually mean one of three things: overmixing the batter, underwhipped egg whites, or overbaking. Check your meringue first—it should hold stiff peaks. Also ensure you're folding gently and not deflating the air. Finally, pull them out when a toothpick comes out clean but slightly moist.
Can I substitute the cream cheese frosting?
Try buttercream (mix ½ cup softened butter, 2 cups powdered sugar, 2 tbsp milk, and 1 tsp vanilla) or chocolate ganache (melt ½ cup chocolate chips with ¼ cup heavy cream). The tangy cream cheese complements the rich chocolate perfectly, but these alternatives work beautifully too.