
Desserts
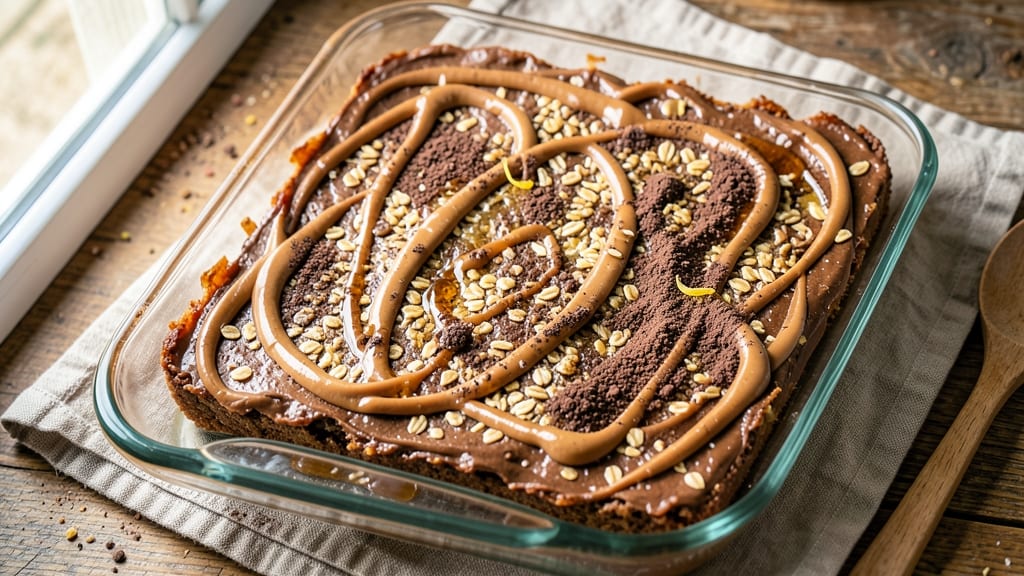
This no-bake banana chocolate protein bar recipe transforms simple pantry staples into dense, energy-packed bars that taste like dessert but fuel your body. The secret lies in blending ripe bananas, peanut butter, and protein powder into a thick, fudgy base that sets naturally in the fridge—no oven required.
I developed this recipe during a busy week when I needed a quick, nutrient-dense snack that my family would actually eat, and it became an instant hit.
The beauty of these protein bars is their customizable simplicity. You can adjust the protein content by swapping vanilla or chocolate protein powder, or boost the crunch with chopped nuts, seeds, or dark chocolate chips.
The peanut butter adds rich flavor and healthy fats, while the cocoa powder gives them that classic chocolatey taste. With just 15 minutes of prep time and no baking, these bars are perfect for meal prep or last-minute energy boosts.
What you’ll end up with is a batch of fudgy, chocolatey bars that hold their shape without being dry or crumbly. They’re packed with protein, fiber, and natural sweetness from the bananas, making them a guilt-free treat that satisfies cravings while keeping you full.
The texture is surprisingly dense—almost like a cross between a protein bar and a brownie—thanks to the combination of oats, peanut butter, and mashed banana.
These bars stay fresh in the fridge for up to a week, making them ideal for gym bags, office lunches, or after-school snacks. For extra texture, press a layer of crushed peanuts or granola into the top before chilling. Let’s get started—your pantry is about to become your protein station!
Ingredients for banana chocolate protein bar
Simple pantry staples transform into fudgy, protein-packed bars with no baking required.
| Ingredient | Amount | Notes |
|---|---|---|
| Ripe Bananas 🍌 | 2 cups | Mashed to smooth consistency |
| Creamy Peanut Butter 🥜 | 1 cup | Natural, no added sugar |
| Chocolate Protein Powder 🍫 | 1 cup | Vegan blend preferred |
| Quick Oats 🌾 | 2 cups | Old-fashioned or rolled |
| Unsweetened Cocoa Powder 🍫 | ½ cup | Natural, not Dutch-processed |
| Pure Maple Syrup 🍯 | ¼ cup | For extra sweetness |
| Vanilla Extract 🌿 | 1 tbsp | Pure alcohol-free if preferred |
| Chia Seeds 🌱 | 2 tbsp | For binding and omega-3s |
| Dark Chocolate Chips 🍫 | ½ cup | Vegan, 70% cocoa minimum |
| Crushed Peanuts 🥜 | ¼ cup | For topping texture |
| Sea Salt 🧂 | ½ tsp | Fine grain preferred |
| Ground Flaxseed 🌾 | 2 tbsp | For extra binding |
The bananas are the star here—use ones that are ripe with brown spots for maximum sweetness. Trader Joe's or Whole Foods bulk bins are great for oats and chia seeds, but any store works. For the peanut butter, natural brands like Crazy Richard's or Smucker's give the best flavor without added sugar. The chocolate protein powder makes these bars actually functional—Orgain or Naked Nutrition are solid vegan options. Don't skip the cocoa powder; it's what makes them taste like real chocolate bars.
No peanut butter? Almond butter or sunflower seed butter work just as well. Short on protein powder? Substitute more oats or add a scoop of vanilla protein powder if you prefer. The dark chocolate chips can be swapped for vegan carob chips or dried fruit if you want to cut sugar. For extra crunch, press granola or chopped nuts into the top before chilling. The flaxseed is non-negotiable—it's what helps these bars hold together without being dry.
These bars keep for 1 week in the fridge, wrapped tightly in parchment paper. For longer storage, freeze portions for up to 3 months. I always make a double batch—one for the week and one to stash in the freezer. The texture improves after chilling for 24 hours, so patience pays off. Pack them in individual containers for easy grab-and-go snacks.
Why You'll Love This Recipe
- No-Fuss Mixing: I swear by the "dump-and-stir" method here—just mash those bananas, toss in the peanut butter and protein powder, then fold in the oats. The cocoa powder melts right into the mix, no extra steps. Honestly, it’s the kind of recipe where you can chat with your kid about their day while prepping.
- Taste Like a Treat: That combo of ripe bananas and peanut butter? It’s like a natural candy bar, but the chocolate protein powder and cocoa powder turn it into something rich and satisfying. I’ll be real: my gym buddy’s "healthy" bars can’t compete with this—it’s the kind of flavor that makes you forget it’s packed with protein.
- Meal Prep Hero: These bars keep perfectly for a week in the fridge, and they’re my go-to for post-workout snacks or busy mornings. I make a big batch on Sundays, freeze half, and grab one on my way out the door—no thinking required. (Yes, even on a Tuesday night.)
- Budget-Friendly Power: You’re using pantry staples here: oats, peanut butter, and bananas that might’ve otherwise gone bad. The protein powder is the only splurge, but it stretches to make so many bars. Between us, I’ve made 12 of these for under $10—and they disappear fast.
Step-by-step instructions for banana chocolate protein bars
Here's how to make these no-bake energy bites with a perfect peanut butter crunch.
Mash the Bananas and Mix Wet Ingredients
Start by mashing the 2 cups ripe bananas in a medium bowl until completely smooth—no lumps should remain. This is your base, so take your time to get it perfectly creamy. Add the 1 cup creamy peanut butter, 1 cup chocolate protein powder, 0.25 cup pure maple syrup, 1 tbsp vanilla extract, 2 tbsp chia seeds, 2 tbsp ground flaxseed, and 0.5 tsp sea salt. Stir everything together until fully combined and smooth.
Here's the thing—chia seeds and flaxseed need to be fully incorporated to bind the mixture properly. If it looks too thick, add a splash of water, but don't overdo it. The texture should be like thick cookie dough but still moldable. This wet mixture is the foundation of your bars, so make sure it's perfectly smooth before moving on.
Fold in Dry Ingredients and Chocolate Chips
In a separate large bowl, whisk together the 2 cups quick oats and 0.5 cup unsweetened cocoa powder. This dry mixture should be uniform with no cocoa powder clumps remaining. Now, add the wet banana mixture to the dry ingredients and gently fold everything together using a spatula. You want to combine them just until everything is evenly distributed—don't overmix or you'll develop gluten in the oats and make the bars tough.
Next, fold in the 0.5 cup dark chocolate chips by hand. I like to use my fingers for this part so I can feel when they're evenly distributed. The chocolate chips should be scattered throughout but still visible—this gives each bite that satisfying crunch and sweet surprise. If the mixture feels too sticky, you can refrigerate it for 10 minutes to firm up slightly before shaping.
Shape and Chill the Bars
Line an 8x8-inch baking dish with parchment paper, leaving an overhang on all sides for easy removal. Press the mixture firmly and evenly into the pan, using the back of a spoon to create a smooth, even surface. Sprinkle the 0.25 cup crushed peanuts evenly over the top and press them gently into the surface so they stick.
Cover the dish with plastic wrap and refrigerate for at least 2 hours—this is crucial for the bars to set properly. The longer they chill, the firmer they'll be when you cut them. I usually make them the night before so they're perfectly firm for slicing. If you're short on time, you can freeze them for 30 minutes as a quick alternative, but chilling overnight gives the best texture.
Cut and Serve Your Protein Bars
Once the bars are fully set, remove them from the fridge and carefully lift them out of the pan using the parchment paper overhang. Use a sharp knife to cut them into 12 equal bars—about 2 inches wide each. Here's a pro tip: dip your knife in hot water between cuts to prevent the bars from sticking and getting messy.
These bars will keep in the fridge for up to 5 days or in the freezer for 2 weeks. They're perfect for post-workout energy, a quick breakfast, or a satisfying snack. The combination of creamy peanut butter, rich chocolate, and crunchy peanuts makes each bite irresistibly delicious while keeping you fueled. Enjoy them as-is or with a dollop of almond butter for extra protein!
Pro Tips For Making Banana Chocolate Protein Bar
- Mash Bananas First: I learned this the hard way—blending ripe bananas into the mix makes them watery and turns your bars into a mushy mess. Use a fork to mash them first, breaking up any large chunks until they’re smooth but still thick. This keeps the texture firm and chewy, not gluey.
- Use Warm Peanut Butter: Cold peanut butter from the fridge will make your dough stiff and hard to mix. Microwave it for 10-15 seconds or let it sit in a warm bowl for a minute—just enough to soften it. The dough will come together faster, and the flavor blends more evenly.
- Don’t Overmix the Dough: Once you add the protein powder and cocoa, resist the urge to stir like you’re making pancake batter. Mix just until everything is combined—overworking it heats up the peanut butter and can make the bars dense. A few lumps are fine; they’ll disappear when pressed.
- Press Firmly, Then Chill: Pack the dough into the pan as tightly as possible—this isn’t the time to be gentle. After shaping, pop it in the fridge for 15 minutes before slicing. Skipping this step means bars that crumble at the edges, no matter how hard you press. (Yes, even if you’re impatient like me.)
Troubleshooting this recipe
Bars Too Sticky
If your mixture feels too sticky to shape, don't panic—this is common with ripe bananas. First, try chilling the dough for 10-15 minutes in the fridge to firm it up. If it's still too wet, add 1-2 tbsp more quick oats or 1 tbsp ground flaxseed to absorb excess moisture.
For extra insurance, I sometimes sprinkle a pinch of sea salt on the parchment paper before pressing the dough to help with adhesion. 💡
Crumbling Texture
Crumbling usually means the bars didn't chill long enough or lack proper binding agents. Make sure you're using 2 tbsp ground flaxseed and 2 tbsp chia seeds—these are crucial for structure. If you skipped either, add 1 tbsp more flaxseed and mix well.
Also, ensure your bars chill for the full 2 hours (or overnight) before cutting. For future batches, press the mixture firmly into the pan to eliminate air pockets that can cause crumbling. ⚡
Chocolate Chips Sink
If your chocolate chips sink to the bottom, it's likely because the dough was too warm when you added them. Let the wet mixture cool slightly before folding in the chips, or chill the dough for 10 minutes first.
For a foolproof method, I recommend adding the chips in two batches—fold in half first, then add the remaining half. This gradual approach helps distribute them evenly without sinking. 🍫
Bars Don't Hold Shape
When bars fall apart when cutting, it's usually a binding issue. Double-check that you've incorporated all the chia seeds and flaxseed thoroughly—they need to be fully hydrated to work properly. If you're using a different protein powder, some brands bind better than others.
I recommend Orgain or Naked Nutrition vegan blends for optimal texture. For extra stability, press the dough into the pan more firmly before chilling. ✨
Peanut Butter Separation
Natural peanut butter can sometimes separate if it's too warm when mixed. To prevent this, store your peanut butter in the fridge until ready to use, then let it sit at room temperature for just 5-10 minutes before measuring.
If separation occurs, whisk the peanut butter vigorously until smooth before adding it to the banana mixture. For a smoother texture, I also recommend using creamy peanut butter rather than chunky. 🥜
Bars Taste Bland
If your bars lack flavor, it's likely because the chocolate or peanut butter wasn't strong enough. Use high-quality dark chocolate chips (70% cocoa or higher) and natural peanut butter with no added sugar for maximum flavor.
For an extra boost, add ½ tsp cinnamon or ¼ tsp espresso powder to the wet ingredients. The maple syrup also adds depth—don't skimp on this ingredient. 💛
Nutrition facts
Frequently asked questions
Can I make these protein bars without peanut butter?
Swap the peanut butter for almond butter, sunflower seed butter, or even cashew butter for a nut-free option. The texture will be slightly smoother, but the flavor remains rich and satisfying. Just ensure your butter is natural and unsweetened to maintain the protein bar's nutritional balance.
How do I adjust the protein content in these bars?
To boost protein, add ½ cup more protein powder or swap in vanilla protein powder for a milder flavor. For a lower-protein version, reduce the protein powder by ¼ cup and add 2 tbsp more oats instead. The bars will still taste delicious while adjusting to your dietary needs.
Can I use fresh bananas instead of ripe ones?
Fresh, unripe bananas won't work well—they're too firm and lack natural sweetness. Ripe bananas with brown spots are essential for the perfect texture and flavor. If you're worried about overripeness, freeze the bananas for 1 hour before mashing to make them easier to blend smoothly.
Are these bars gluten-free?
Only if you use certified gluten-free oats. Regular oats often contain trace amounts of gluten due to cross-contamination. For a truly gluten-free version, substitute the oats with gluten-free rolled oats or crushed gluten-free granola. Always check labels to avoid hidden gluten sources.
How can I make these bars nut-free?
Skip the peanut butter and crushed peanuts, then replace them with sunflower seed butter and pumpkin seeds for crunch. The texture will be slightly different but still delicious. For extra binding, add 1 extra tbsp ground flaxseed to compensate for the absence of nuts.